Thursday, April 21, 2022

Recyling, UH-OH.... AND when in doubt, use 3

While rummaging through old projects, leftover blocks etc. I came across these blocks used in an applique workshop I used to teach. I had made a quilt to use as a sample which eventually sold and I thought, why not use these blocks to make another. I don't like making the same thing twice but this was just too convenient and ready to use. I needed another large quilt for my booth at Woolworth Walk, so this would be perfect.
The blocks were all created out of my own hand dyed fabric . The leaves were fused down using a fusible web and machine appliqued in place using the blanket stitch (my favorite).
To get a smooth applique and avoid tunneling, a stablizer should be ironed on the back. I use Sulky's Totally Stable iron on and temporary. It's wonderful and does the trick. 
I will gently remove the remainer of the paper before quilting. Removal is easy to do using something that can poke underneath like a pin or point of a seam ripper.
Well, they certainly did look nice until I came upon the UH-OH moment when I discovered the rip...almost looked like a burn.....in one of the blocks. The blocks were already sewn together and I had no more fabric....What to do.
Well one thought,.......cover it up as I've done on several occasions before. I pulled out my Perfect Circles from Karen Kay Buckley and found the perfect size. I traced around the clear plastic circle template on green fabric fused with a fusible web...
cut it out, stood back for a look-see and yes, this would work. But it might look odd to have one odd little circle in the middle of a quilt...People might get suspicious...People might be doing the same thing with their mishaps...People might.........People might.......(holding breath)......so I took the advice of the late and very great Roberta Horton who always said, when you make a mistake, repeat it 2 more times. That way it will look intentional...best advice I've ever gotten. So you know the rest.
And no...I didn't cover the quilt with circles but I did use enough to make it look intentional...all I can say is Whew! and Thank You Roberta!
Next step is to quilt this and get it to Woolworth...Have a great dayt!

Monday, February 14, 2022

Eco-Printed Scarves

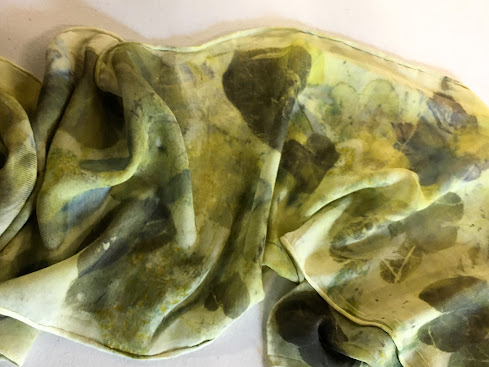
One of the things I wanted to do with this (new to me) Eco printing technique was to make scarves. I sell them in my booth at the Woolworth Walk Art Gallery in downtown Asheville, N.C. so this would be a good way to go. You are basically working on a white scarf....color can be added with a color carrier (another post) but can be tricky and would like to start with a little color to begin with. 
Soooo.....I decided on my favorite "go to", very versatile paint - Dye na Flow. It's not really my favorite but by far, the easiest and will work on any fiber - both natural and synthetic. It is the consistency of water and leaves no hand on the fabric....so I use it a lot and also have used it in many workshops I've taught over the years. When I want some visual texture, I use a crumpled up piece of plastic underneath so the paint will form bubbles and dry that way...to me, it's more interesting than a smooth, solid color.
The middle scarf here, is the one in the picture above that was just painted...this scarf has been Eco printed using the heat press. I'm not sure how I like it. The background color seemed to migrate towards the center leaving the edges very light, although maybe that could be an interesting effect. The leaves do not show very well either...maybe a lighter wash of Dye-na-Flow would have been better...it's all experimenting at this point which I also enjoy.
This one was created at a friends house with a heat press. The blue (might be a smoke bush or a plum tree from our subdivision) really pops but think I need more of something in there
This third one done on crepe du Chine was very soft and mottled...I like the amount of leaves...could have used more of a pop but I can go back and color some of it with something permanent....very subtlely....This technique takes a lot of experimenting and practice and even then you never know what will happen.
Now here's a beauty done by my friend Kathie Briggs...she just nailed it;  this is something to strive for.
This is the first one I did in a workshop with Vicki Bennett....a different method of printing..using a turkey roaster and steaming it rather than a heat press...both produce interesting results.

I'm chomping at the bit for spring to come and the trees to get their beautiful leaves...

Happy Valentines Day everyone...Wishing you a wonderful, happy and love-filled day!


Sunday, January 30, 2022

Coloring Cards

Good Morning...I'm sitting here in my window looking at a pile of cold snow...I do love snow, it's pretty and so peaceful when it's falling, but once it's down on the ground I would like it to go away. I know...... it doesn't work that way. One of the things I've been trying to catch up on during these long winter months is doing something with all the Eco printing I did last fall. The trees are naked... so nothing to print with...now.
On many of the prints I did I used color overlays to give the background some color. It's easy peasy to lay a sheet of colored or Origami paper over the leaf while printing. Make sure it's not a fugitive paper which means the color won't last. For example, colored tissue paper is fugitive so not a good thing to use. The leaf was also traced around with a Pigma pen...giving it more definition. I used watercolor pencils to do some shading. You can see the pencil lines in the upper right corner.
and here
and very obviously here, using 2 different colored pencils. They do look unfinished but once you add a drop of water...
They blend out so well.
The are some droplets from the printing process in close to the leaf (above), but adding color makes them look intentional. I use a small round tip brush and a little cup of water. I dip the brush in, shake off or blot the excess and apply to the pencil lines. The water turns it into water color paint. 
I use Derwent watercolor 72 because I always wanted the big super duper size box of Crayola's and never got them...so this in fact serves another purpose besides lots of color choices...that of fulfilling a childhood fantasy...except they don't have the smell of a new box of crayons....
Well....back on track...here is a before and after of a leaf in the process of developing some personality. First the pencil markings...can use several colors...
then blending it with water.
Here is another one using several colors and also some color enhancement on the leaf itself.
Here is a"before" but don't have the after but it was a very soft colored leaf ...it needed a little oomf.
Another using purple and needs the water to make it complete.

 This is a finished one, 2 different watercolor penciles, outlined with a pigma pen, torn edges on the paper before printing and burnt edges with a wood burning tool before mounting on a card. And the nice thing about this is that if you have some "not so great" prints, they can often be saved with a little embellishing!

Have a great day...stay warm.