Tuesday, July 30, 2013

The Postcard

Another small piece recently finished is The Postcard. It will be going in the Galleribba Gallery - see the link on the left to get to this gallery of artists featuring small wall art. 
 I used lots of  leftovers which is always fun - feel like I'm making a dent in my stash although with pieces this small it's not even a drop in the bucket. I had some deconstructive screen printed fabric to start with which had somehow picked up a faint bit of yellow along the way.
 So I though I would mix in yellow as an accent
 and combine it with some mushroom printed fabric - also a leftover. The yellow was stamped or screened with writing to give it some texture.
 I found an old piece of blue and white Shibori fabric and screened it with an image of an old postcard addressed to my grandmother - Cornelia Adams. The postcard is close to 100 years old, so it's a real treasure which I love to use.
And The Postcard - look for it on the Galleribba website.
Til next time.

Tuesday, July 23, 2013

Small Quilts - Aftermath Revisited

I've been working on small pieces for the Southern Highland Fair in October, pinning them up on my design wall as I go along. I'm a slow worker so seeing multiple pieces renews my sense of accomplishment. 
I love collecting sheers to use in my work; I sometimes paint a piece of organza
and stamp on top...on left.
I also love to rummage through the curtain department and bins of sewing stores. There are so many really great sheers with such interesting prints. So this one won out, with its many possibilities within the same piece and a good color for layering.
I actually started piece this a while back but it worked its way to the back burner for some reason. So I rediscovered this piece of fabric with an acrylic medium transfer of lichen on top which I quickly screened with a tree image.
And this great sheer, which I screened on top of using the same screen in reverse. 
The layered effect worked well with the sheer I used.
So then what to use along the side. I liked this color but thought the screened dragonflies might be too much so I flipped it over - easy to do when using batiks...
and screened another tree along the edge using black textile paint on the orange and discharge paste on the black areas.  To tone down the orangey area, black tulle was used. My son thought it looked like the remnants of a forest fire and named it "Aftermath".
I liked his way of thinking and made him go through some of my pieces and rename them.
Til next time.....

Thursday, July 18, 2013

Alzheimer's Art Quilt Initiative

The Alzheimer's Art Quilt Initiative - AAQI has done wonderful work in raising funds for medical research for this dreaded disease. With the help of the quilting community and many wonderful volunteers, Ami Simms has raised over a million dollars. She has devoted much of her life to this cause and accomplished more than she ever dreamed possible. 
The AAQ Initiative is coming to an end. There are still many opportunities to purchase a small piece on line, bid on a quilt online at the monthly auction or if you're planning a trip to the International Quilt Festival in the fall,  buy one in person.
I am part of the $1,000 pledge; this is probably the last piece I'll be donating. "Buzzin'" is 9" x 12", hand dyed fabrics, machine appliqued with a buttonhole stitch and a beaded edge. The screened image of a dragonfly gives it the name - Buzzin'.
Hope you'll visit their website and consider buying one of these small pieces of art to help such a great cause....

Monday, July 15, 2013

And a Few More

And just a few more to share from our dyeing adventure last week. A couple of years ago a friend introduced me to Radiance by Kaufman Fabrics - a blend of 55% cotton and 45% silk.  I had forgotten I had it and came upon it while we were preparing our fabric for dyeing. This fabric had not been washed ahead of time like the instructions suggested so I had no idea how it would react.
I wrapped it around marbles, only doing a small piece.
The interesting thing about this fabric was the "halo" around the resisted areas......It was a grayish color, not a lighter blue like you would think - really pretty and a surprise.
And the big old fashioned pink plastic hair rollers were used to resist areas of this fabric.  Seeing these rollers brought back memories of living in a college dorm, going to dinner with my hair in curlers and wearing a big wooly hat to cover them up (we couldn't wear rollers in the dining hall).Why do I remember silly things like that?
Kate brought some vintage clothing as the textures were really nice.  She dipped them for a few seconds to get a paler color.
This was a favorite in my batch.  It was a blend as it didn't take a real deep color.  It was also a sheer and had been rusted so the combination made for pretty results.
Til next time....Have a great week.

Saturday, July 13, 2013

Fiber Junkies at Play Pt. 2

The results are in from our play day with indigo and we all passed with flying colors. 
Using rusted fabrics with Indigo was a great idea. The one above was clamped with a square shaped resist; it might have been the old plastic slides. The one in the middle was dyed over a lightly colored fabric.
The piece in the middle is one of my favorites - think it belongs to Mary; she dyed over a deconstructed piece of fabric which needed some zing. I love the way it turned out.
This next piece was originally an old bed sheet dyed a bright orange-yellow and then wrapped on a pole and dipped in indigo. I love the results - dark on the right fading to almost nothing on the left. I will be anxious to see what is done with this.
To get a lighter value of indigo, fabric needs to be dipped for about 3 seconds.  We all thought it a good idea to have some lighter values to work with. The above piece was left in for 10 mins which created the dark lines.  There was too much white when all was said and done so back into the pot it went for 3 seconds to add more color to the white. One of the neat things about indigo - you can dip and re-dip.
This piece made by Kate was amazing; it was already hand stitched when she got here.  I imagine it took a lot of time to stitch and then to remove the stitching afterwards but worth the effort.
Kate also brought some vintage clothing to experiment with. This bodice and the piece to the left had some pretty lace on it all of which dyed well.  Kate gave the bodice to me and I'm anxious to take it apart to see how the darts and other stitched areas served as resists.
Val had a big piece of yellow-white silk which she over-dyed with indigo.  It came out beautiful.
and a view from my deck - they all looked so luscious. Even more to come.

Thursday, July 11, 2013

Fiber Junkies at Play

And play we did! We gathered at my house for a day of Indigo dyeing. The weather has been so rainy off and on everyday - we weren't quite sure what to expect, but as the saying goes "somebody up there likes us" and let the sun shine, shine, shine.  
I told everyone to bring rubber gloves, the ones that go up your arm. Denny took me literally - up to the shoulder - where does one find gloves like that?
The morning was spend folding, clamping and trying many kinds of resists on different natural fibers including vintage clothing and table linens, prints and old dyed bed sheets.
The vats were ready after a couple of hours when the flower appears (bubbles) and time for fun - dunking the fabric.
It only takes a few minutes to get deep color.
I'm always amazed at the yellow-green color when it first comes out of the dye. This is a good sign and shows the indigo is strong.
Kate brought some printed fabric she wanted to experiment with - it came out really nice.
We had some extensive pleating done with hand stitching which turned out beautiful (results in next post).
Even some old slides made a great resist.
Everything was hung to dry before removing the resists.
Some of the resists were tedious to remove like the tied and stitched ones, but worth the time when we saw the results - lots of ooohhing and ahhing.
More to come tomorrow. I must add that I love this technique but even more so when done with friends. It's so much fun to see what others come up with, fabric and resist choices and of course the wonderful results.

Wednesday, July 10, 2013

42 Years and Counting

I woke up this morning and remembered that 42 years ago this day - July 10, I was getting ready for a wedding - mine! Where do the years go!
Yesterday was our Fiber Junkies meeting. It was great fun but most of it took place outside in the hot sun, so today...I'm totally wiped. More on our great dyeing adventure tomorrow.

Wednesday, July 3, 2013

Some Beautiful Lima Beans

So you're probably thinking ... this is a post about my garden or a good recipe but not so  (-:  - it's my latest results using Indigo and one of the things I used - lima beans...more to follow on that. It's been a rainy week and hard to find the moments to dye the prepared fabric from last week; but with the sun peeking in and out yesterday, I managed to dip and dye and hang on the line.  It did rain before they were dry so they got a good rinsing. 
 I liked the crepe de Chine scarf and the way it took the dye. I was even thinking of rusting over some of the white areas; it might be an interesting combination.
 I had taken a piece of silk organza, machined rows of stitching and then gathered it up tightly. It wasn't very successful as far as getting some white lines - barely noticeable.  I think if I used a heavier fabric, it would have been more effective.
 This PFD mercerized cotton fabric resisted with large washers had great indigo color in the areas with the most exposure.

 And another piece of mercerized cotton resisted with triangular shaped pieces of plexiglass.
 This tone on tone vintage napkin was dyed using no resists - not as much fun to do but good to have some solids on hand.
 This was a piece of deconstructive screen printed fabric that I wasn't thrilled with; I used pieces of plexiglass to get the effect and think I like it better.
 And another piece of deconstructive screenprinted fabric. I liked it better before.
 This outlet cover was done on mercerized cotton - very deep color in the outside areas.
 This was tedious to prepare time wise but I'm happy with the results. This is crepe de Chine resisted with wood screws. The small blue circle in the center is the head of the wood screw.
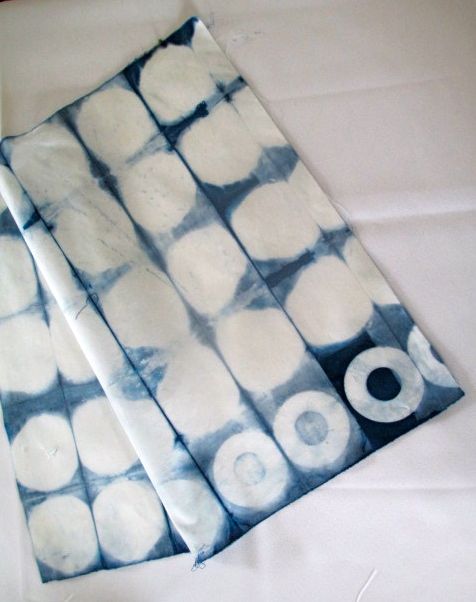
 I think this is my favorite -  a piece of rayon resisted with corks. The color is very intense and the skinny white lines are from the gimp cord wrapping around each cork.  Another plus, you have to drink the wine in order to get the corks. ( - :
 And the lima bean fabric. It would have been great except I left the fabric soaking too long.  The fabric should be soaked in water around 30 minutes before dipping in the dye. But, I forgot and left it overnight and then it rained the next day, postponing my dye day so all it all, the lima beans were in water a very long time.
 Since they were wrapped in a vintage napkin which wasn't a tight weave and older fibers, they pushed their way out as they swelled up.  So my lovely fabric has a hole in the center of each "flower".
But the lima beans, are they ever pretty....enough so that when they dry, I'm going to spray shellac them and display them in a dish so all was not lost. Til next time....A Happy 4th to you all.