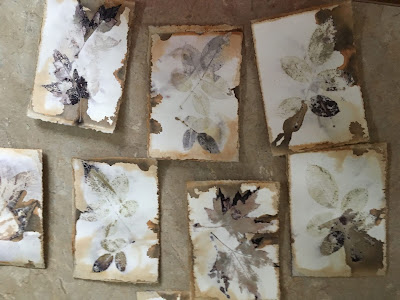
In lieu of what happened last time (previous post), I decided to try different shingles to see if the black on the print might have had something to do with the shingles. I went to Home Depot and bought a bundle, brought them home and dove in.
My husband is a woodworker and has lots of tools..many of which I've become very comfortable with using. This table saw is big and loud, but does a quick and accurate job of cutting the shingles to size.It's hard to tell, but the thickness is different from end to end as you can see...
here...so to make it easy for clamping I will have to clamp the sandwich flip-flop the thick and thin ends together.
I used a print to calculate size...sets for 8 x 10s, sets for 5 x 7s and one for bookmarks..
The old ones which are warped still work but am anxious to try the new ones.

I also wanted to try some handmade paper to print on.
Here are some before and afters...befores on top, afters on bottom.The Maple on the left did not print well...looks like the water did not permeate parts of the leaf...still getting black areas and I don't know why.
Another set of before and afters...None of them were permeated with water bath enough...these are usually in the middle and probably clamped too tightly.
Okay...so far, I'm not thrilled and eco printing is often like that...just have no idea what you're going to get.
On some of these, I'll go back and print over them...and some that are not totally printed but just a faint image in parts can also be pretty on their own.
I used Kilimanjaro 130 llb watercolor paper from Cheap Joes (their store brand) and it works very well. The paper runs 22" x 30" with 2 deckled edges. I use a deckle edge ruler to do all 4 edges. It's a little more work but looks nice. Sometimes (like one above on right), I also burn the edge with a woodburning tool.
Here is an example of how I printed over a "not so great" print....think it looks interesting.
If you can find large leaf Eucalyptus, go for it...by far the best for printing. All I've been able to get lately is the small leaf.
Here's what's so fun about using a heavier paper, the mirror ghost image. You get the one image that has direct contact with the leaf (right) and the back side of the neighboring paper with a mirror image. Sometimes both sides of the same paper are good and a hard decision as to which side to use.

The leaves on the left are Sumac...we have none on our property but some along a little country road near us...so my husband drives, I jump out of the car and clip, clip real fast and hop back in...Sumac prints really well.
The Maples print very well...
and above, overprints which I think turned out fine....and nice to be able to save a card.


FABULOUS!!!!
ReplyDeleteI think you got some great results. Here in CT the leaves are all over the ground. On my morning walk I couldn't help admiring them. Now you have found a wonderfully to preserve the images.
ReplyDeletewow...love these!!!! Red bud is so cool as is Eucalyptus print(s)....I think you got some great results!!!
ReplyDeleteThese are really beautiful. Thanks for documenting all the steps in the process!
ReplyDelete