Sunday, August 25, 2019

Indigo and Shibori Pt. 2

So my internet has been down for several days and my sharing of results have been delayed. After our fun day of Indigo dyeing, I had 2 luscious pots of dye still very useable and the following day free and clear + sunshine...so what does that suggest to you.....Yup....my own personal day of working with Indigo....not as much fun as being with the girls, but fun still the same.
Here's the first batch, hanging to dry....I was hunting for all sorts of things to use......Luckily many friends over the years have given me old white linens; I also went into my bins of hand dyes and do-overs....all did well ......so here's my show and tell....bottom left - a scarf blank I got years ago created with the Devore technique and ready for dyeing. The fabric, in order to use the Devore technique has to be a blended fabric of rayon and silk. The chemical will burn away the rayon velvet and leave the silk behind. Patterning is done on velvet (dark), those areas that are obvious were not treated with chemical...Light silk areas were. On right, I had a piece of dyed rayon, not too pretty so it was folded and dipped...I like it better now.


I have always loved silk and have rolls of it on hand in every type...Above is crepe du Chine, noil. and silk broadcloth - all very successful but different depths of color.

On left, folded and clipped with a clothespin, on right a variety of folding and crimping techniques
The piece above was resisted using long wood screws; the screw was placed inside the fabric, string wrapped around starting at head of screw and going all the way down..an interesting effect. Below, this may be my favorite piece. I started with an unsuccessful piece of brown hand dyed fabric, folded and clamped it with CD discs. I loved the effect it achieved. With this technique as with so many in surface design, you never know what to expect which is part of the fun. Even if you get an "ugly", there will always be something else you can do to it.

The 2 above, left - fabric clamped with old fashion curlers. On right, corks were placed in different areas and fabric wrapped around and tied. On bottom, left - fabric loosely placed inside of a stocking to achieve varying degrees of color - done on a silk crepe. The fabric on right had already been dyed years before and needed a lift so I folded and clamped it to create some darker areas.

Above, another brown piece, folded and clamped. Brown seems to do pretty well with Indigo...a nice marriage of colors.

On left, another wrapping of corks or buttons, on right - far right a piece of tone on tone pink silk and to the left a piece of hand dyed rayon from a friend. It was a large piece and thought I could spare a small amount to try Indigo on...loved ithe results.
This piece of mercerized cotton was scrunched and put in a stocking. I wanted a lot of white areas. Below...both the same fabric but one on left is true color, the one on right got washed out somehow. I wanted to show the amazing texture...It's a China silk which has been crinkled and fused to a backing gauze. It is bulky but beautiful; it has been hand washed several times, doesn't need to be ironed...almost afraid I would lose the crinkles...
A fun day was had by all.....(me ( - : )
Sunday, August 18, 2019

Indigo and Shibori with the Fiber Junkies

Fiber Junkies ( my fiber group of 6) met at my home this past week for a day of Shibori and Indigo. I made 2 pots of Indigo the day before and always hold my breath when it's time to see if it was successful or not. Often you can tell by the flower that's on top. I don't know why it's call a flower as it looks like a large bunch of bubbles but it is where the live and most concentrated part of the Indigo is.
And this is a good flower so I know my Indigo will be good and strong. You can fix your fabrics anyway you want - just dunking or folding and clamping or using other types of resists. Once your fabrics are fixed, it's necessary to soak them in a bucket of water, opening the pores of the fabric to make them more receptive to the Indigo dye. (left) You also have to remove the flower from the top and keep it covered tightly as oxygen will weaken it. (on right.... before covering)
Your fabric should stay in the Indigo bucket for at least 10 - 15 mins. When it is first removed it is an ugly yellow - green and hard to get a picture as it starts to turn so quickly. Oxygen is what turns it blue...so above is fabric halfway there and below is a piece of fabric already turned completely blue.

Most of us hung them without undoing the resists. You can go either way as the oxygen will only react with those areas that have Indigo on them.
Kate had some pretty plexiglass pieces she purchased for this technique. She folded her fabric until it was the size of a small square, put a template on top and bottom, clamped them in place and put in Indigo.
 Beautiful results and so sorry I didn't get a picture of the clamped fabric before it was dunked.
Indigo reacts differently on different fibers; I have tried all natural fibers and have had good results. The one piece on top that is predominently white, was scrunched inside of an old stocking so much of the fabric wouldn't be touched by Indigo. I like having some with white in it.
This was our working station with buckets of water, Indigo and other things.
Hmmmm ....what shall I do next....
Sue and Kate...I think Kates shirt was put in Indigo; she uses it as a work shirt.
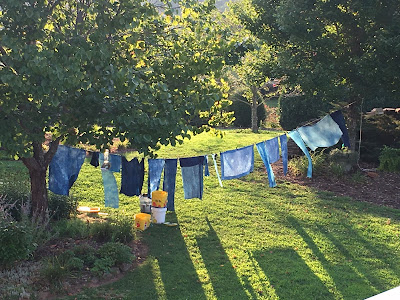
We had 2 lines which we used every inch of...
Mary looking very happy.
I don't know whose piece this is but thought it turned out extra pretty.
Gen just taking a moment to relax...Where's your wine?...It was a great day, the weather although hot cooperated by not bringing us rain...always fun with my FJ friends.
Stay tuned for part 2...Since the buckets were at my house, I got to use them again which I did the next day and have some fun things to share.

Monday, August 12, 2019

PTA - August 2019

Our August gathering of PTA was at Lindas' home where good conversation, lots of laughs, great show and tell and home made flower pots seem to rule the day.

We have such a creative and very prolific group of gals. A few months back we all went on a mini field trip to the new open studio/store of Folkwear. Some of us bought patterns - 3 of the one above. I've yet to make mine but Mareen made hers in a beautiful what looked to be a rayon, cotton blend. The fabric was soft, thin and had a beautiful hand to it, which was effective in this particular style. The fabric was striped with a fringe; the left side has a sleeve, the right just a piece that comes over to the left which is very pretty.
Mareen also showed us a top she completed. She recently was an assistant to a workshop that Georgia B was teaching at John Campbell Folk Art School and this was the project...soooo
 she had to make one for herself. The wide border (above) was perfect with the other fabrics she chose for the quilt.
Marene also showed her mini challenge piece the 2 of us decided to do after hearing Susan Cleveland's lecture. We made a small piece using the teeny tiny piping as well as Prairie points...They both look so different but feature the same techniques.
Dort's brother in law has a favorite kimona he wears - fabric pattern of a Sumo wrestler (below right). It ripped across the neckline and she was asked to repair it but had none of the same fabric....sooooo, she improvised with a mermaid applique and little "pasties" and as an extra little laugh, look what happens when you lift the little tassel (on left, red line). Too cute!


Lynne is a member of the Modern Art Quilt Guild and recently took part in a challenge - "Color Your Negative Space". A large bag held lots of crayons, each member was to reach in (no peeking!) and pick out 3 colors, then color those crayons on the challenge sheet (above left)....and then create a piece using just the 3 colors + white. A great idea for a challenge.
Lynne also shared with us her new quilting pattern which seemed to work better with the tensions of her machine.
 Georgia is working on a skirt from the Folkwear Pattern series, it will be lovely when finished.

Linda makes the most amazing pots using 4 different types of materials. They are very organic looking. Some have patterning which she creates by pressing clear wrap and then wire etc. into them as they are drying (like the one below). They all have drainage and her plants are thriving.

It was a feast for the eyes and even more fun...
we all took some home!
 Mary showed us 3 new pieces...think I may have shown before but worth seeing again...the top, lots of thread painting with appliqued trees on top. The lower left a detail of a piece using deconstructive screen printed fabric as a background and on the right - a cozy up quilt for Mary when she watches TV or reads at night.


Linda is a big Boston Terrier person and has always had them, fostered them etc....these are her children. "Charlie" (Charlene) is the granddaughter of my favorite one of her doggies - Libby who died a couple of years back....but little Charlie lives on and decided to join us for the meeting. I must say she was very well behaved and quite content to spend the day with us. 
We had a wonderful meeting and came home full of inspiration, food and wine.