Friday, April 30, 2010

Talented Friends

Recently, I took a break from the gown to visit with some "Fiber Friends". I always leave these get togethers so inspired and fully charged to move forward with my art. This particular day was no exception. Martine House, an accomplished fiber artist does a lot of hand work while working with fiber, glass, metal and other interesting things. Her work is always full of detail, texture and fascinating to see up close and personal. Martine showed us an "accordian type book" she made, each page filled with a piece she created. As you can see lots of metal, fiber and glazes. It's wonderful to see in person. Take a peak. I love the fine wire detail and


the beautiful glazes and threads.
Martine molds and hammers each piece.
Nancy Bruce is my friend the colorist who is quickly becoming a master felter. These pieces are ones I've not seen before. Nancy does wet felting, working with rovings and 3 dimensional shapes which involve using a resist - like a piece of cardboard in between the back and front to prevent a 3 dimensional object from felting to itself.

I love the wonderful color on this piece.
Didn't expect this on the front, did you?
Stay tuned for more showcasing of some wonderful fiber/mixed media work of my talented "Fiber Friends".

Wednesday, April 28, 2010

It's Done, It's Delivered, TA...DA!

I just returned from Atlanta to deliver the gown, have a final fitting/tweaking and some celebration time. I had a hard time with the bustle, the final thing to do. I read everything I could, talked to my expert friend, but it's so individual to each dress and how it fits the bride. I had to do this final step in Atlanta so off I went, Bernina under 1 arm, gown under the other. The dress had to be on a body and just "played" with to see the best place to pull it up to bustle.
The outer lace had to be attached to the charmeuse underneath so they worked as "one" without pulling. Soooooo - remember the little thread crochets, the ones you do with your fingers. They worked perfect. I made them @ 1 1/2" long and attached the outer lace to the underneath layer at various points on the train and back of dress.
There are many different ways to bustle a gown but I decided to use the button and thread loop method. The flounce or "bustle is then folded in and less obvious which appealed to me. I first thought of attaching ribbons and tyeing them from the inside but that left the bustle folded out which was bulky.
I'm all thumbs when it comes to sewing buttons on. I really love the ones with holes in them so you can do them by machine, but these are shank style, silk covered buttons I purchased.
The border lace was one of the last things to do. I think it adds a lot of softness to the edge.
And the back - this is my favorite part of the gown. It's a "Chapel" train, which is a fairly short train and so pretty.

So it's done, we're both so happy and we celebrated with some great "girly time".
And I want to add how much I've loved taking this journey with you. It's been a roller coaster ride of emotions but one with a good ending. I've so appreciated the comments and emails along the way, it was perfect timing, when I needed to hear something positive or get a pat on the back - so thank you. I'll post lots and lots of pictures after the big day - May 15th. Pray for sunshine, it's a garden wedding!
Til next time

Friday, April 23, 2010

More Fiber Junkies

At our Fiber Junkies meeting this week, one of the highlights is always the projects, techniques and products we share with each other. There's always such a wealth of information and inspiration, I come home with my mind reeling. One of our members, Carol Sloan, is a mixed media artist and creates  wonderful things. She's been working with texture and an embellisher which does needlepunch work. I have a special attachment for my Bernina that does the same thing, works fantastic, but not a separate machine. Here's some pictures and sketches Carol tried to recreate with texture.
This was done with fusible web which was painted with Lumiere paint. Lumiere is a textile paint with a high metallic content, also very dense so gives great coverage. Parts of the web cracked giving it more texture.
This next piece was created using the needlepunch machine, lots of snippets of thread, fabrics, cheesecloth, yarn etc. It was a most interesting piece in person, something you could pour over and still keep finding things.

Carol loves to paint papers and use them in journals.

This next one might be my favorite. We're all hoping this might be one of our mini-workshops this year. I want one for myself, one for my daughter - I want...I want.

On another note, this weekend, I head to Atlanta for a final fitting and delivery of the gown. The wedding is 3 weeks from tomorrow. I guess I'm ready, I guess I'm ready. Now to find a really good "water-proof" mascara!

Thursday, April 22, 2010

I Spy Quilt Directions

In a recent post, I showed this very easy, very colorful "I Spy" quilt I'm making for my niece's baby. Below are sizes of blocks and general directions. This is such a fun quilt to make, think you'll enjoy it. It's also pretty much a "no brainer" kind of quilt which I truly appreciate from time to time - just play and sew. There are 5 blocks to a unit below and 12 units make a 36" x 48" quilt. For the smaller quilt, this will be 3 units across and 4 units down. For the larger 48" x 60" quilt of 20 units it will be 4 units across and 5 units down.
For the baby quilts, I use 12 units - still big enough to sit on but small enough to drag around.
For each unit cut the following:
(5) 4 1/2" squares of novelty fabric
(5) 2 1/2" x 4 1/2" bright solid fabric
(2 ) 2 1/2" x 6 1/2" bright solid fabric
Assemble 5 blocks of novelty with bright that measure 2 1/2" x 4 1/2" See below.
If you have a directional print, make sure it's going in the right direction when you place it in the unit.
On 2 of these blocks, add a bright solid that measures 2 1/2" x 6 1/2" so it looks like the block below.
Follow the diagram below to assemble the units into bigger blocks of 12" - this is 1 unit. For the smaller quilt, sew 3 units together to make rows 1 and the same for row 3 following the layout below. It's more interesting when assembled to alternate each row so rows 1 & 3 are the same and rows 2 & 4 are the same.
Sew 3 of these units together to make rows 2 & 4 which is a mirror image of rows 1 & 3.
After completing the rows, sew rows 1 & 2 together, 3 & 4 together and then both halves together to make your quilt top. Have fun!

Wednesday, April 21, 2010

A Wonderful Surprise

Yesterday, our Fiber Junkies group met - always inspiring, mind boggling, full of ideas, information and good fun. We met at Patsy's home in her large, wonderful, "full of every new gadget, batting and thread studio". We did machine quilting with the Master, she is truly, one of the best!  During our afternoon show and tell, I received the most wonderful surprise from Nancy, "Colorist Extraordinaire". I know I've talked before about Nancy and her wonderful color eye and how she'll dye anything that isn't nailed down. She brought some beautiful things to show. First her felting is wonderful and this is what we'll be doing next month. The inside crocheted flower is made by another member -Carol.
We'll also be making paper - coloring and embossing it. Nancy says it's easy, we'll see.

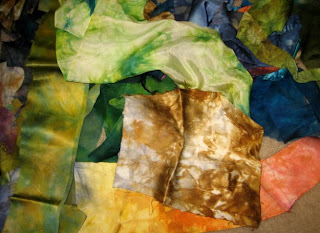
Nancy brought lots of silk she had dyed, too luscious for words! It was a feast for the eyes and I just wanted to curl up in the middle of it!
She made this felted piece for Mary who does magical things with felt.
And now onto the surprise. While cutting out the wedding gown, I had a bag going on the side filling it with scraps of silk, selvages I didn't use etc knowing full well, I had better not throw them out - Nancy will put them to good use. So from the white silk scraps
Nancy did this
and this
and let me pick some pieces to make into a memory piece of the gown fabric. How nice is that! Thank you Nancy, it was a great surprise!
On another note - another "Wedding Dream" to report, this one from my daughter. Will they ever stop! Jill was here a couple of weeks ago for spring break and we went to see Alice and in the movie, Alice is painting the roses red. Jill had a dream that same night that I painted all the buttons on the Wedding Gown - Blue! Well I still have to sew the buttons on and promise not to paint them anything!

Sunday, April 18, 2010

I Spy

About a year ago, I made this I Spy quilt top to be put away until my sweet niece became pregnant, which she is now and due in June. This is the first baby of our adult kids so it's very exciting and also exciting I'm going to be a Great-Aunt. I've made several of these quilts: small children love them - the bright colors and pictures of animals and other child-friendly things to find. I hold off quilting until I know the babies name (and hope for a short name) so I can quilt it in the colored strips. Things like "Max is cute, Max is smart" and so on filling all the longer strips throughout the quilt with sayings.
It's a fun quilt to make, easy and cheerful to work on and you know it's going to a good home. This is NOT the quilt you hang on a wall; it is the quilt to be dragged around, sat on and other various and sundry things a small child will do. It's meant to be loved, used and perhaps become their "binky". Both my kids had their favorite "binkys" which are still packed away in the attic somewhere. My daughter, when she was 3, thought it ridiculous that her cousin Joey called his "binky" a "banky". Here are some close-ups of the future "binky" (or "banky").
This is such a fun block - lots of potential. I've thought if you didn't want to make it an "I spy", you could do photos printed on fabric in the place where the images are or flowers printed on fabric or floral prints to use as the images.I promise to post the sizes and how it all fits together in my next blog. My niece doesn't read my blog or at least I'm hoping she doesn't so it will be a surprise. Her new little guy will be called "Max" - a great name and SHORT!  Stay tuned for directions on how to make this cute and easy block.

Friday, April 16, 2010

Almost Done

YES! There's an end in sight. My daughter will walk down the aisle with a finished gown, that fits and doesn't fall down, lace not falling off, a hem that's straight, a bustle that bustles! I'm excited, relieved,..... happy and a small part of me a little sorry to see this monumental project behind me. I'm working on the Bridal veil now which originally was to be very simple - a half day job, quick and easy - 1..2..3. BUT then we decided it needed lace on the edge and what good is lace if it's not beaded! Getting off track, this scenario reminds me of the many "Mafia" movies we've watched (My husband was an FBI agent who worked organized crime). Our all time favorite line and used often around our house is "Just when I thought I was out, they pull me back in" said in a very heavy New York accent. I found myself laughing to myself saying almost the same thing. Just when I thought I was done, they pull me back in.
Well the beading does make it beautiful, so back to the beading table for a little while longer!
The veil was cut out twice - once before it was to have lace
and another after pinning the lace and realizing it would be difficult to attach with it so close to the edge. So having bought lots of extra tulle, I cut veil # 2 - marked the finished edge with a Sharpie and cut @ 6" beyond the edge
making it easier to put in a hoop for sewing (pin marks the middle).
Then came the beading.
I am counting how many beads I have left. I'm not wanting to order any more and not figuring on beading the veil has left me without beads for "wiggle room". Each one is precious now as I scour my studio for those that have fallen off or under the tables.
After it is beaded, I trim the edge to the shape of the appliques and attach it to the comb.
This morning I sent it off to Atlanta - safe travels sweet Bridal Veil. 

Thursday, April 15, 2010

Hudson River Valley Art Workshops Pt. 2

Well, I should be out walking; it's early morning and that's my routine but the fog is so thick - can't see 2 feet in front of you. I walk in an area where there's no cars and very safe but still, is fog a good excuse? I know I would much rather be here doing this.
The other day I wrote about our bird families hoping someone would tell me the name of the one bird. My friend Heather wrote to tell me that beautiful fluorescent blue colored bird is a Tree Swallow and they compete with Bluebirds for the houses. Our birdhouses are around 60 feet apart; both families seem to be thriving and completely ignoring each other so that's a good thing!
In my last blog I did talk about this wonderful school - the Hudson River Art Workshops in Greenville, NY. They run week long workshops and some 3 day ones. I've always found the long workshops to be  beneficial on so many levels. From Oct 31 - Nov 6, I'll be presenting a workshop using lots of machine skills; students can choose to make a sampler notebook of just the skills and/or work on a project. Some more things we'll cover are writing and stamping on fabric to create an interesting background....

off the edge applique

using sheers such as tulle and organza to create dimension
and taking the sheers one step further by writing on them and "aging" them with inks.

I think it will be a great week. I've also heard that Kim' husband -  owner of the lodge,  is a chef - yes a genuine, for real chef AND the food is wonderful! That's all I'ld have to hear - I'm IN!
I'm sitting by my window, the fog is lifting, getting clear and sunny, guess that means I have to walk!
Have a good day.

Tuesday, April 13, 2010

Hudson River Valley Art Workshops

The Hudson River Valley Art Workshops is a wonderful B&B nestled in the beautiful Catskill Mountains in upstate NY in a little town called Greenville. I know a lot about Greenville; I spent a small part and some of the happiest days of my childhood there. It was a "one-horse", one blinking light town. There was a central school - K-12 and a little Baptist church down the road where we spent many evenings at potlucks and prayer meetings. I lived with my aunt on 173 acres of land - magical land, that held many adventures. Well back on track, I will be teaching at this wonderful facility for a week starting Oct 31 and going through Nov 6 of this year. The name of the workshop is "Inspirations from Nature". I love teaching week-long workshops, so much meaty material and the added bonus of getting to know everyone so well. It's so rewarding and fun. I'm excited.

SO WHAT WILL I BE TEACHING? !
I'll be covering lots of machine skills along with microwave dyeing and a few surface design techniques. Here's a preview. Most quilts start with a slight mottling of the background, done in a designated microwave using procion mx dyes. Sometimes I'll do it twice so I can use more than 1 color. I love this technique as it takes the flatness away from a solid colored background.
Sometimes I'll do extra wide strips with stamping to lay on top of the bigger piece - hopefully to create more depth and texture in the background.
It's an effective technique and still subtle enough for the more interesting foreground.
Sometimes, I'll use an unusual color and just the one color to microwave dye the background such as in the piece below.
This next piece used a very light color for microwave dyeing - just a suggestion of color to give some movement. So the first thing we'll be doing is "Preparing the Background".
We'll also touch on the use of fabric manipulation to create texture in fabric - things such as fabric and thread crimping, twin needle work - techniques that will add interest to a surface.

We'll also cover different ways to machine applique, to create some fun and interest in the applique itself.
Machine needlelace is great to incorporate it into quilts (below) - this will be covered during the week...

along with dimensional thread work lace done on wire,
and more fun with threads making thread fuzzies.
Bobbin curls using the heavier couching threads
as well as fabric curls.
This is only a small sampling of what we'll be doing, more to follow tomorrow. I think it will be great fun with lots of wonderful things to learn - hope you'll join me.
PS - It's also the most beautiful time of the year in upstate NY with its fall foliage.